Our next challenge is to make "the Perfect Red Dress". Yikes! Off to figure out what to sew!
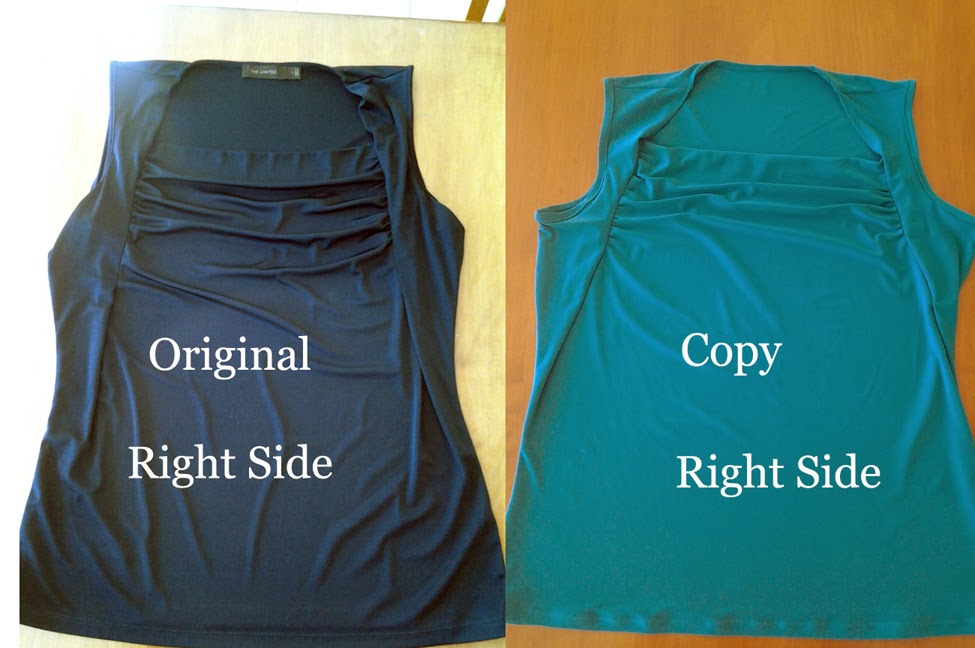
I bought this navy sleeveless top from The Limited a few years ago, and reach for it often. The neckline is flattering and unusual. Why, oh, why didn’t I buy it in every color? So, for this challenge, Fabricista Challenge #3, I decided to copy it. I feel like a Double Mint Twin in these pictures!
Well, the designer must have been either a genius or a madman, because it is all 3 together! I’ve never seen that anywhere before. I’ve been playing around with a new name for it- the rupleadart, or the darpleruche? Here's a close-up of the inside front, so you can see what I mean:
So, for my process, I started with gathering my tools. I buy thin plastic sheeting- the kind they sell in big rolls
at the paint department of home improvement stores, for tracing patterns. I can see through this, and a permanent
marker glides over it very nicely, and it is super cheap! The other things I used were a quilter's ruler, a flexible tape measure, tape, a french curve ruler and Swedish Tracing Paper.
Now for the easy part- the back. So for the back, I turned the top inside out, folded it at
the center back, and lined up the side seams.
With my marker and a quilter’s ruler to help me stay straight, I drew
the center back fold line and hem line onto the plastic sheeting.
With my French curve, I found the curve of the back armhole and then
copied it to the plastic, as well as the curves of the side seam and neck.
The front was not going to be so easy. Not with all of the draping and pleating
going on. I honestly sat and looked at
this piece for a couple of hours, scratching my head, as to what this pattern
was going to look like. Finally, I just decided to start taking measurements on
everything. How long was the
facing? How long was the gathering? Where did the facing join the armhole. Where did the facing join the chest
area. How long was the pleat?
I transferred this to my plastic, and got a pretty good idea
of how they put this thing together. It
really was clever. What looked like it
could be separate pieces, was actually just one piece that was slashed,
gathered , folded, and pleated. I made
up a muslin. Not perfect, made a few
changes. After all, this was the first time
I’m attempting this darpleruche.
Now was the time to transfer this to my pattern paper. I added seam allowances, hem allowances, and marked all of the important points. I cut out my teal green jersey and transferred the markings precisely using a tracing wheel and wax paper.
Now was the time to transfer this to my pattern paper. I added seam allowances, hem allowances, and marked all of the important points. I cut out my teal green jersey and transferred the markings precisely using a tracing wheel and wax paper.
I measured the armhole length, and made an armhole binding
piece that length x 1-1/2” wide.
My jersey is a little thicker than the Limited top, but I’m pretty thrilled with how this mimics the original! One note- the plasticky strip that you see isn't elastic- it is just a thin strip of plastic. I didn't feel that mine needed it, so that is why I omitted it.
The whole thing only takes ¾ yard of fabric, and I can see making this up in a bunch of colors and prints.
I had fun with this challenge, but I probably won't be repeating this process anytime soon. Give me a pattern any day!!! This makes you really appreciate the work that pattern designers do!
Oh, and the pants- Butterick 5893 made from an ITY jersey I got in a Fabric Mart Mystery Bundle!
Please check out all of the contestants creations this week and vote for your favorite at the FabricMart Blog.
Happy Sewing!
Ann


You did a good job. Looks exactly the same! Very cute top too.
ReplyDeleteThank you, Vicki!
DeleteThis is perfection! You nailed it. I love the color!
ReplyDeleteThanks, Kathy. It's one of my favorites, as you can probably tell by my living room!
DeleteGreat job with this copying of RTW garment!
ReplyDeleteThanks, Linda!
DeleteSo cute! I can't tell the original from the copy! Good luck!!!
ReplyDeleteThanks, Sue! Good luck to you as well!
DeleteAnother nice job!
ReplyDeleteThank you, Vanessa!
DeleteHi, Ann! That blue color (the lighter aqua shade) is SO pretty with your complexion...
ReplyDeleteThe tops are duplicates, look at that!!! Yay! :)
Thanks, Dina! I think I'll wear it more than the original because of the color.
ReplyDeleteI can see why you wanted a copy of the original, both intriguing construction and lovely top. Great job of making a copy of it.
ReplyDeleteThank you Sigrid!
ReplyDelete